


Tip: Click the images to enlarge the details.
Overview
LinenFinder LeadFlow allows you to manage user access through defined roles with different permission levels.
This article explains how to access the Users screen, review existing users, and create new user profiles for both Sales and Sales Manager roles. It also covers how invitations are sent and highlights common user-level customization options.
Sales User vs. Sales Manager User
The system supports two primary sales-related roles: Sales User and Sales Manager User. Each role controls what the user can view, create, and manage within LeadFlow.
- Sales User – This user profile will only have access to the opportunities assigned to their pipeline.
- Sales Manager – Users with this role will have access to all user pipelines as well as the ability to add new users, create/adjust stages, and create/adjust tags.
Steps
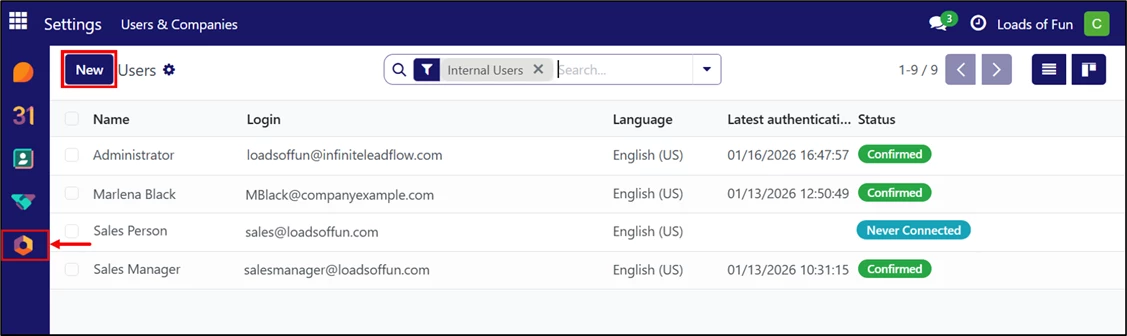
Log in to your LinenFinder LeadFlow account and open the Settings screen from the left-side navigation menu.
The Users screen lists all users configured in the system and displays the following information:
- Name: Shows the user’s full name.
- Login: Shows the user’s email address, which is also used as their login.
- Language: Indicates the language set for the user profile.
- Latest Authentication: Shows the user’s most recent login activity.
- Status:
- “Never Connected” indicates the user has not yet logged in. This status also applies to users who have not received the invitation email.
- “Confirmed” indicates the user has completed the signup process and logged in successfully.
To create a new user profile, click “New.”
Creating a Sales User
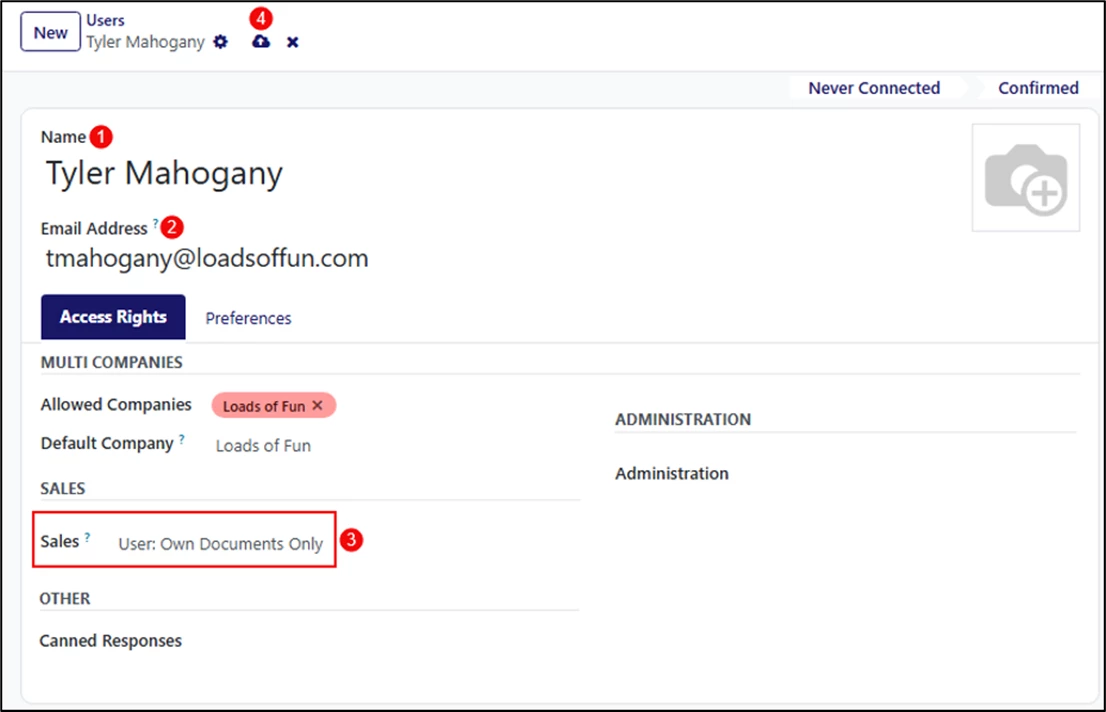
- Enter the user’s full name. You may also enter a display name if needed (for example, “Salesperson 1”).
- Enter the user’s email address.
- In the Sales field, select “User: Own Documents Only.” This setting ensures the salesperson only has access to their assigned opportunities.
- Click the cloud icon to save the changes.
When creating a Sales User, ensure that all other fields on the screen remain blank.
The system will automatically display the user’s first letter as their profile image. You may optionally set a profile picture for the user by clicking the camera icon on the right side of the screen.
Creating a Sales Manager User
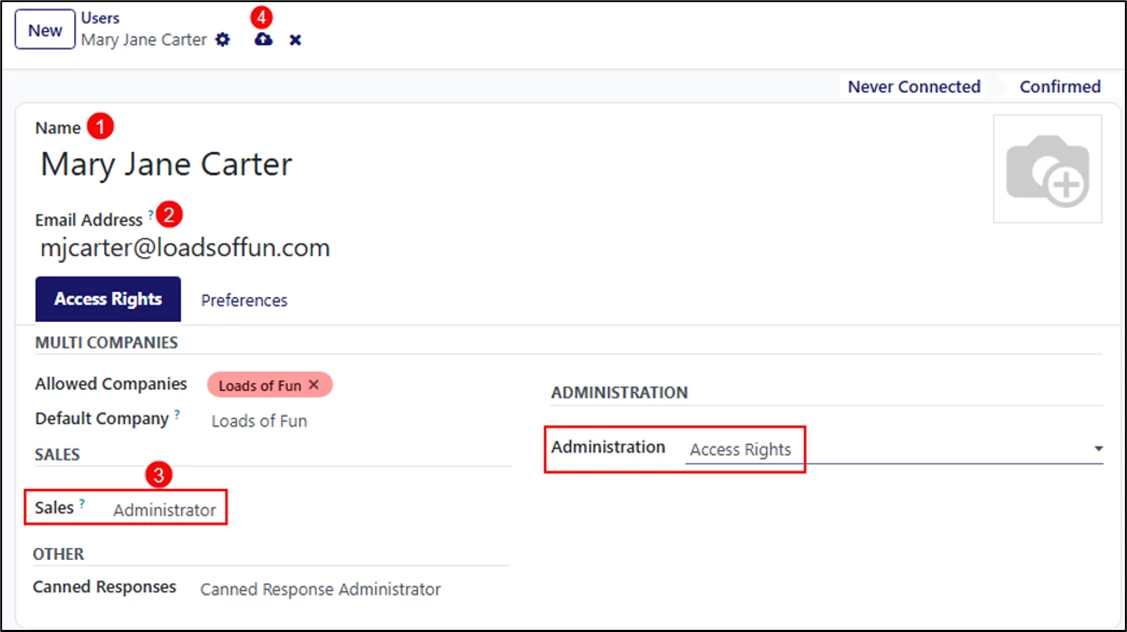
- Enter the user’s full name. You may also enter a display name if needed (for example, “Sales Manager”).
- Enter the user’s email address.
- Complete the following fields:
- Sales: Select “Administrator.”
- Administration: Select “Access Rights.”
- Click the cloud icon to save the changes.
The system will automatically display the user’s first letter as their profile image. You may optionally set a profile picture for the user by clicking the camera icon on the right side of the screen.
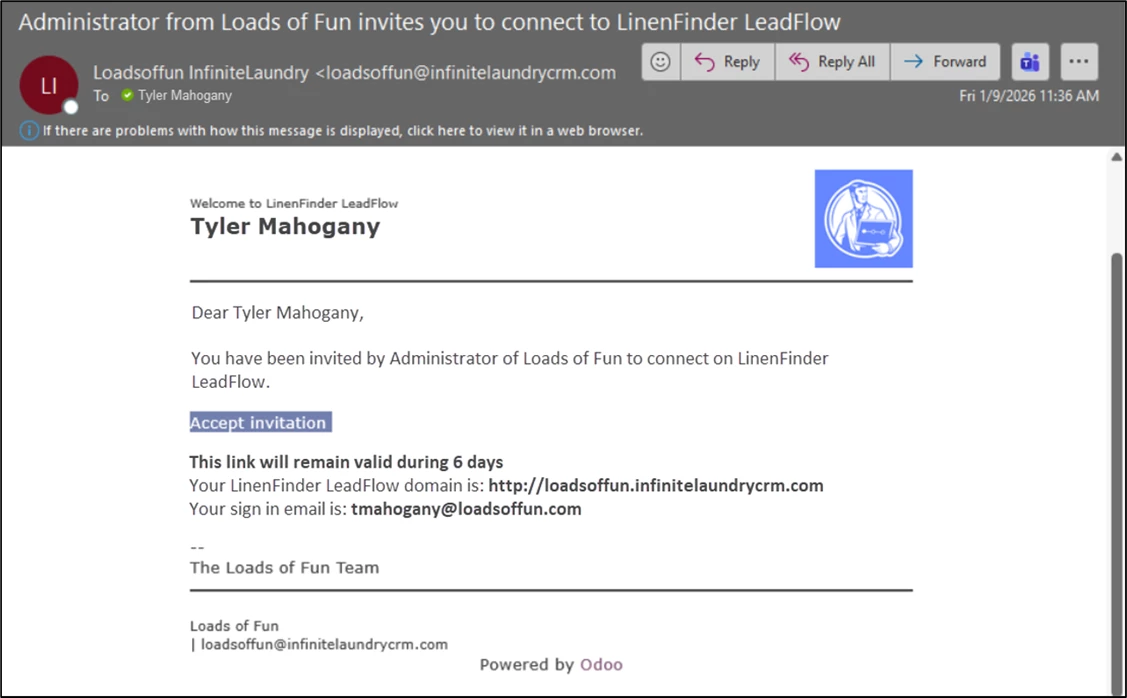
User Invitation Email
Once the user is created, the system will automatically send the user an invitation email prompting them to set their password.
The user will receive an invitation email containing a link to accept the invitation and create their password for the LeadFlow website.
After the password is created, the user will receive a confirmation email stating, “Your password has been updated.” This message can be ignored, and the user can log in immediately.

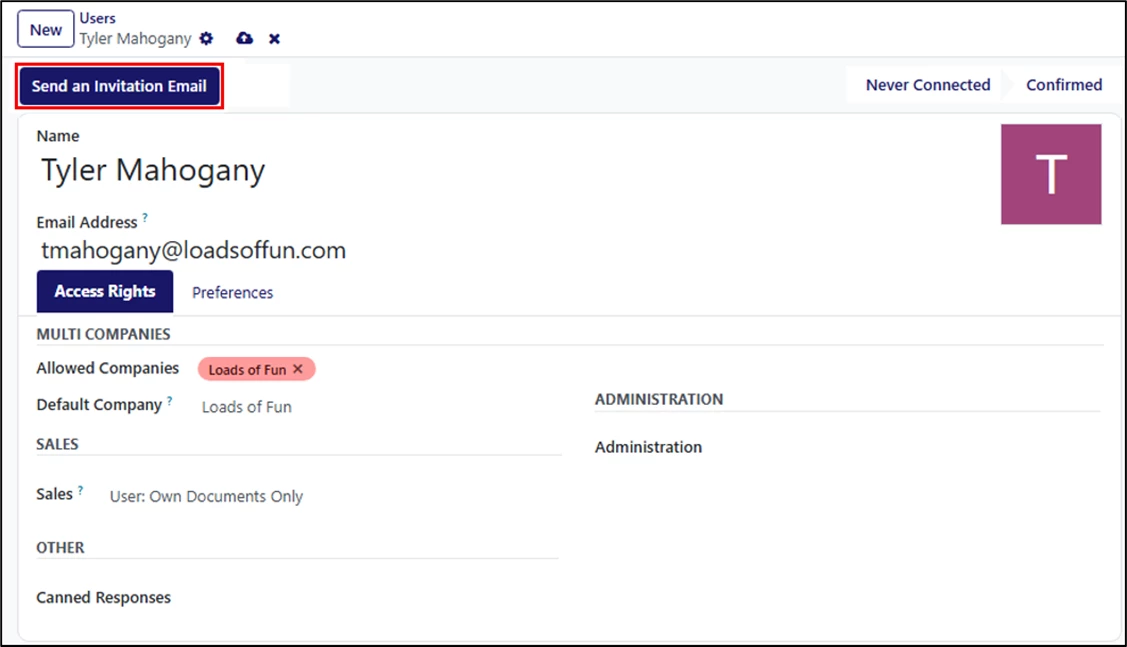
If the user does not receive the invite, you may click the “Send an invitation email” button to resend it.
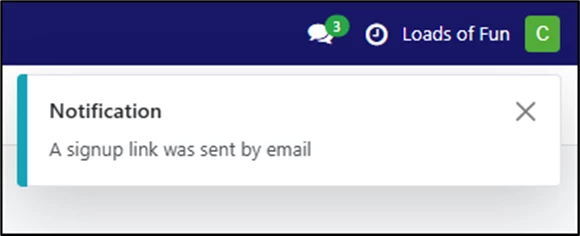
A pop-up at the top right of the screen will indicate that a signup link was sent.
User Customization
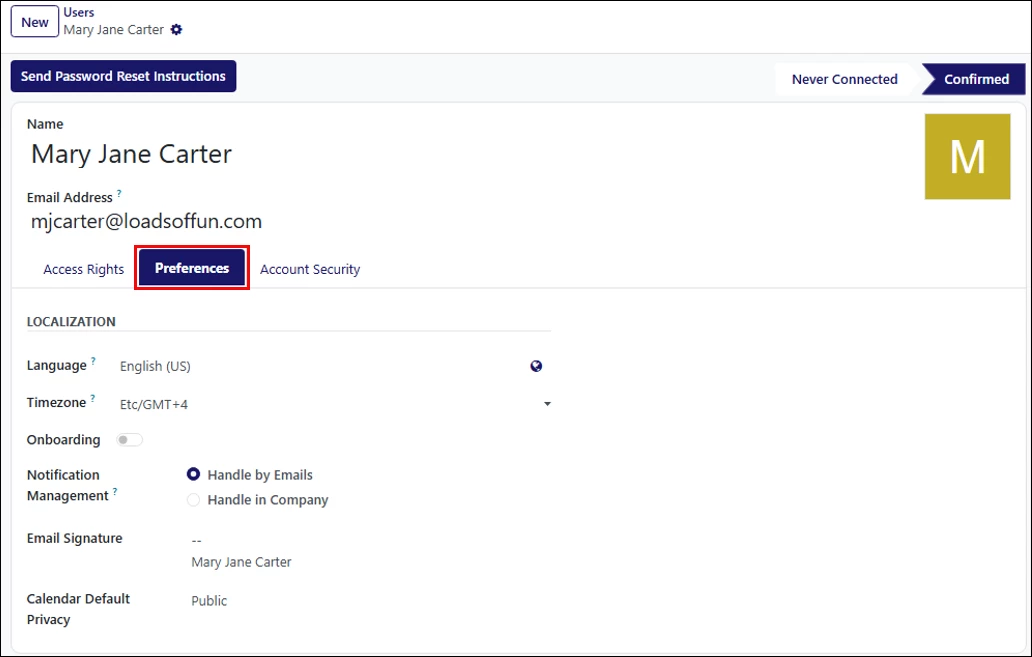
The Preferences tab contains settings that can be customized for each user. The most commonly adjusted options include:
- Language: All emails and documents sent to this user will be translated into the selected language.
- Time Zone: Printed documents and imported or exported data will reflect the selected time zone. If no time zone is selected, the system defaults to UTC (Coordinated Universal Time).
- Email Signature: Allows you to customize the user’s email signature for messages sent from LinenFinder LeadFlow.
- Calendar Default Privacy: Sets the visibility of the user’s calendar as Public (visible to everyone), Private (visible only to the user), or Only Internal Users.
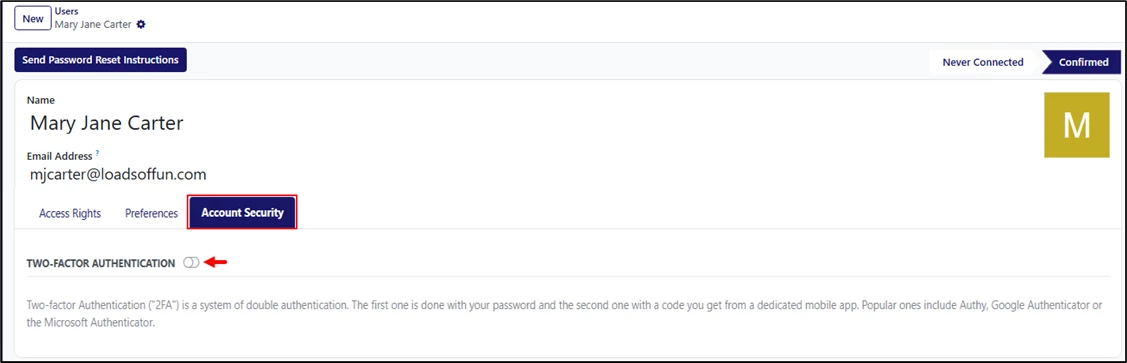
Two-Factor Authentication
The Account Security tab contains the Two-Factor Authentication (2FA) setting. When enabled, users are required to use this additional security step each time they log in.
Two-Factor Authentication uses two forms of verification to confirm a user’s identity. The first step is the user’s password, and the second step is a temporary verification code generated by a mobile authentication app. Commonly used authentication apps include Authy, Google Authenticator, Microsoft Authenticator, and DUO Mobile.
User Management
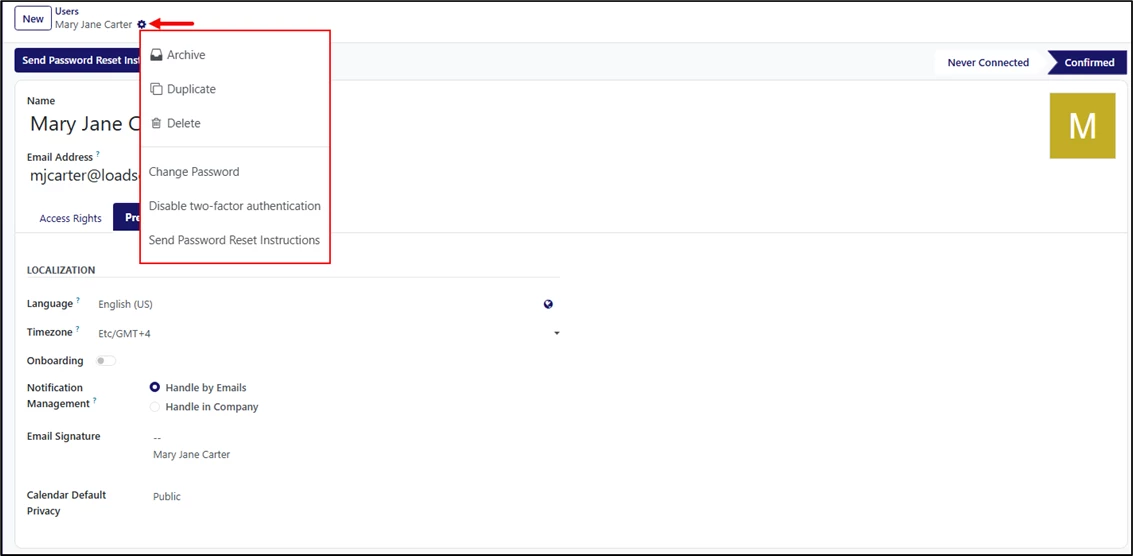
Existing user profiles can be managed directly from the Users screen.
Open the user profile and click the gear icon at the top of the screen. The following actions are available:
- Archive: Deactivates the user while preserving their profile and historical data.
- Duplicate: Creates a new user profile by copying the selected user’s settings, allowing you to quickly create similar users with the same access configuration.
- Delete: Permanently removes the user from the system. Deleted users cannot be recovered and should only be removed if they are no longer needed.
- Change Password: Allows an administrator to manually update the user’s password.
- Disable Two-Factor Authentication: Disables two-factor authentication for the user, allowing them to log in with only their password.
- Send Password Reset Instructions: Sends an email to the user with a link to reset their password and regain access to the system.